Rules Management
Create and manage security restriction rules for your organisation. Select a rule to view its details, linked security classes, and application history.
Creating a New Rule
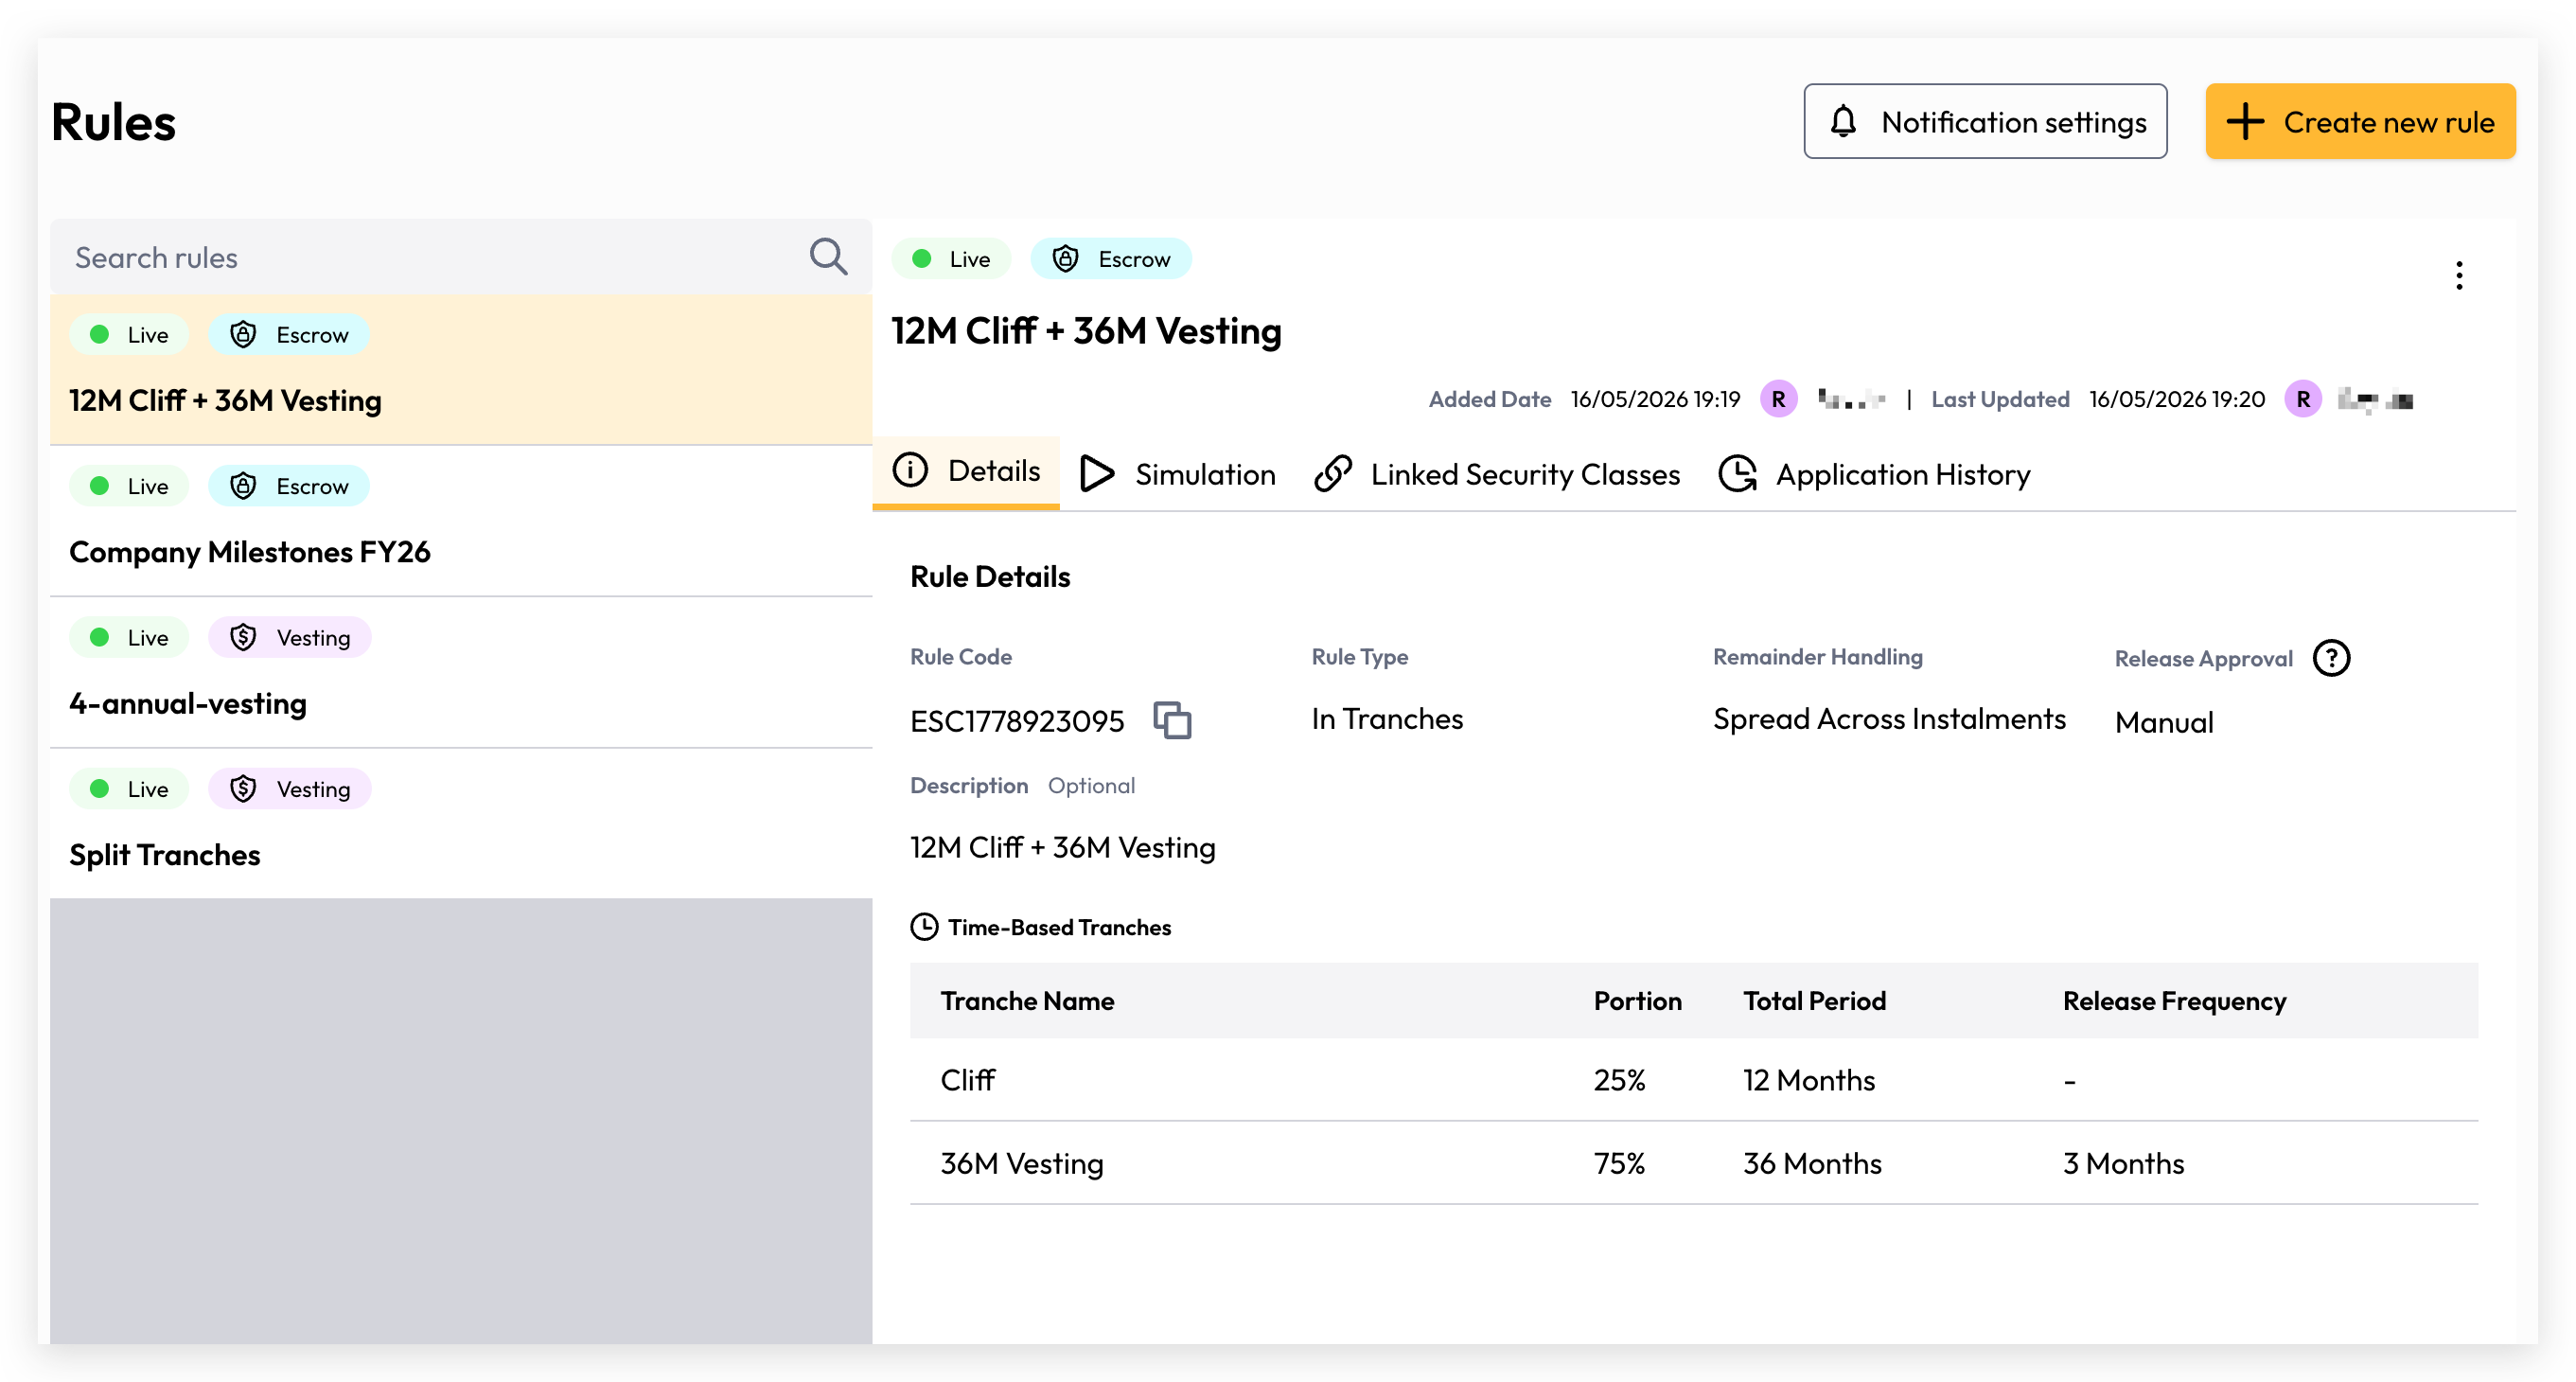
Rules allow you to apply restrictions to your securities — controlling when and how holdings are released to investors. This article walks you through every step of creating a new rule.
Overview
The "Create a New Rule" page is divided into three sequential steps, shown both in the main content area and in the progress panel on the right side of the screen:
Select Restriction Schedule — Choose how securities will be released: all at once, or in stages.
Restriction Configuration — Configure the behaviour, timing, and tranches of the restriction.
Link Security Classes — Attach the rule to one or more of your security classes.
Step 1: Select Restriction Schedule
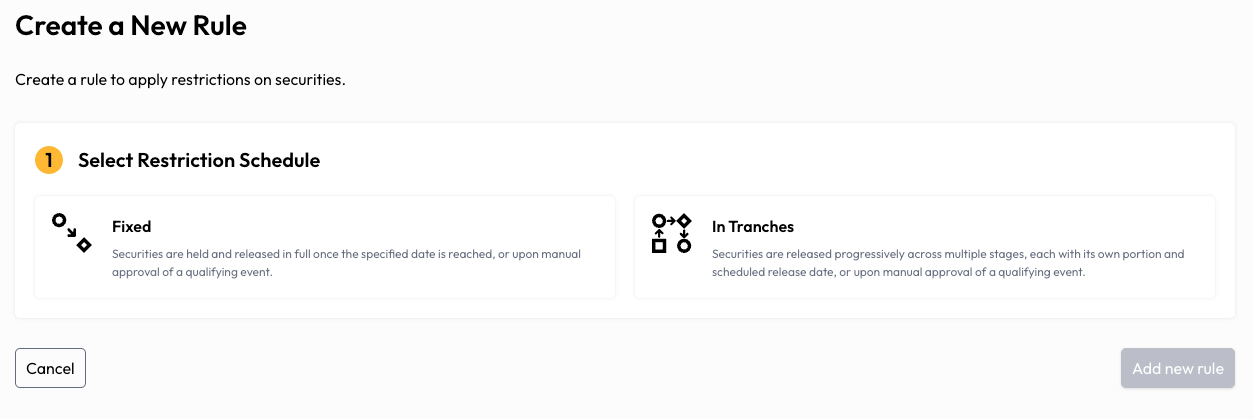
In this step, you choose the restriction schedule that governs how securities are held and released. Two schedule types are available:
Fixed Securities are held and released in full once a specified date is reached, or upon manual approval of a qualifying event. This is an all-or-nothing release — the entire holding is released at once.
In Tranches Securities are released progressively across multiple stages, each with its own portion percentage and scheduled release date, or upon manual approval of a qualifying event. This is suited for graduated vesting or phased lock-up structures.
Once you select a schedule type, it appears as a card in Step 1. You can remove it using the trash icon if you wish to start over.
Step 2: Restriction Configuration
This step defines the detailed behaviour of your rule. The fields shown will differ depending on whether you selected Fixed or In Tranches.
Fields common to both schedule types
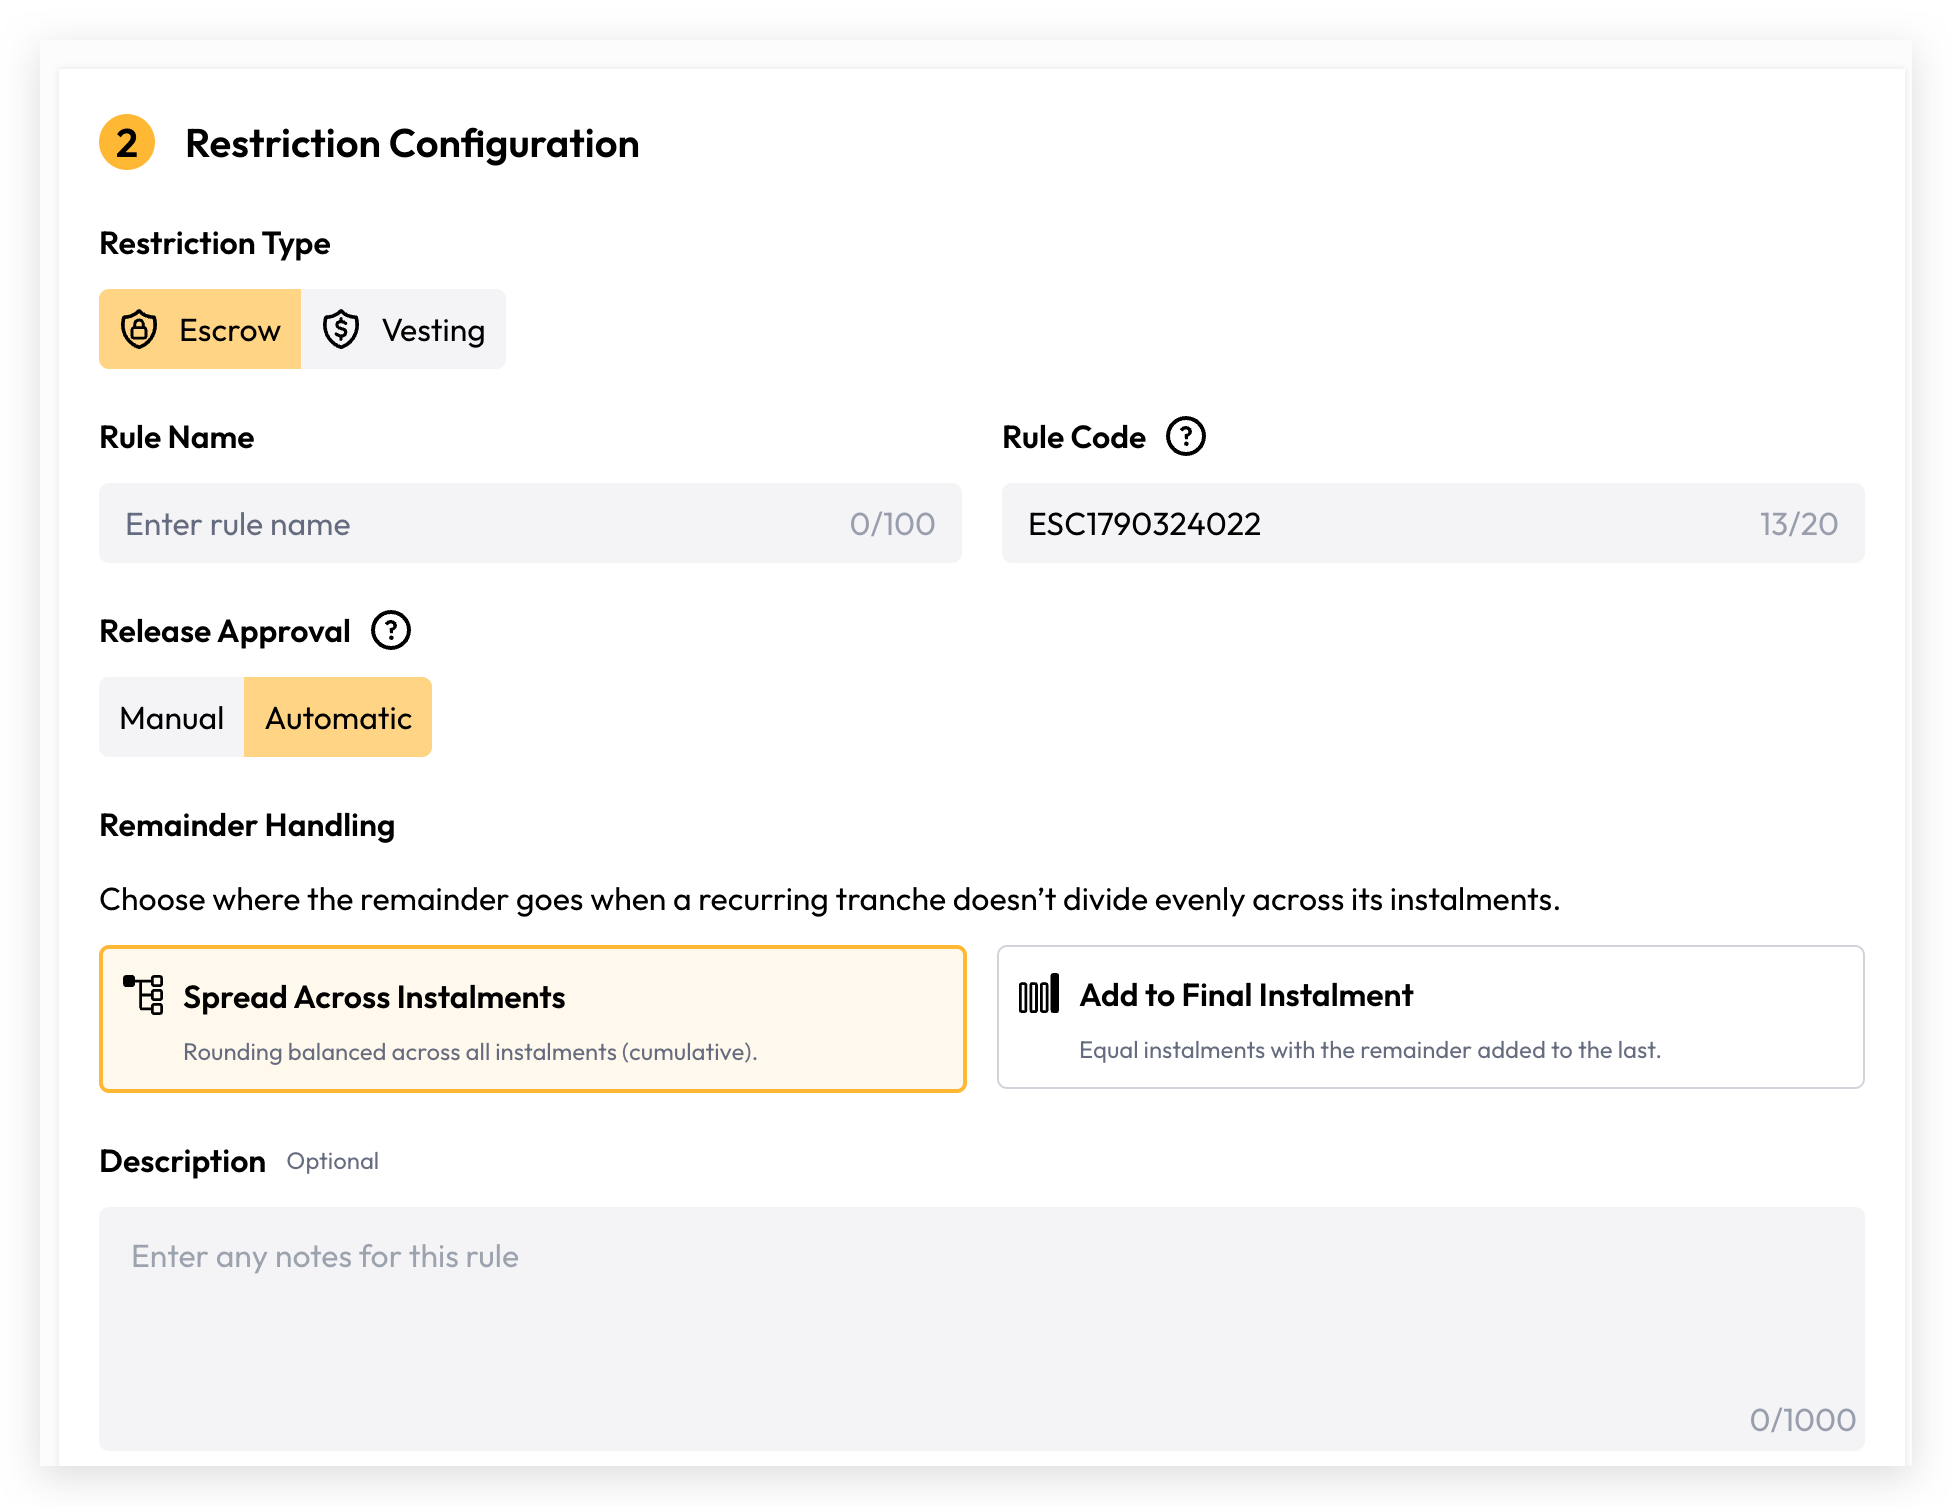
Restriction Type
Choose how the restriction is categorised:
Escrow — The securities are held in escrow. The auto-generated Rule Code will be prefixed with
ESC.Vesting — The securities are subject to a vesting restriction. The auto-generated Rule Code will be prefixed with
VES.
Rule Name
Enter a descriptive name for this rule (up to 100 characters). This name is used to identify the rule throughout the platform.
Rule Code
A unique code is automatically generated to reference this rule (up to 20 characters). The prefix (ESC or VES) is determined by the Restriction Type selected. You can edit this code if needed.
Tip: The Rule Code is a unique identifier used to reference this configured rule across the platform.
Release Approval
Choose how releases are approved once the scheduled date or condition is met:
Manual — A release requires explicit approval before it is processed.
Automatic — The release is processed automatically on the scheduled date without requiring manual approval.
Tip: Releases can be manual (requiring approval) or automatic on the scheduled date.
Description (Optional)
Enter any additional notes or context about this rule (up to 1,000 characters). This field is for internal reference only and does not affect the rule's behaviour.
Fixed schedule: additional fields

When the Fixed schedule type is selected, the following additional fields appear under Restriction Configuration.
Trigger Type
Choose what triggers the restriction to be released:
Time-based — Restrictions are automatically released at regular intervals over a set period. Selecting this option shows the Total Period field.
Event — Restrictions are released when a specific event occurs. Selecting this option shows the Event Conditions field instead.
Total Period (shown when Trigger Type is Time-based)
Define the total duration of the restriction. Enter a number in the text field and select a unit of time: Days, Weeks, Months, or Years. For example, entering 24 and selecting Months sets a 24-month restriction period.
Event Conditions (shown when Trigger Type is Event)
Enter a description of the conditions that must be met for the restriction to be released (up to 1,000 characters). This documents the qualifying event that will trigger the release.
In Tranches schedule: additional fields
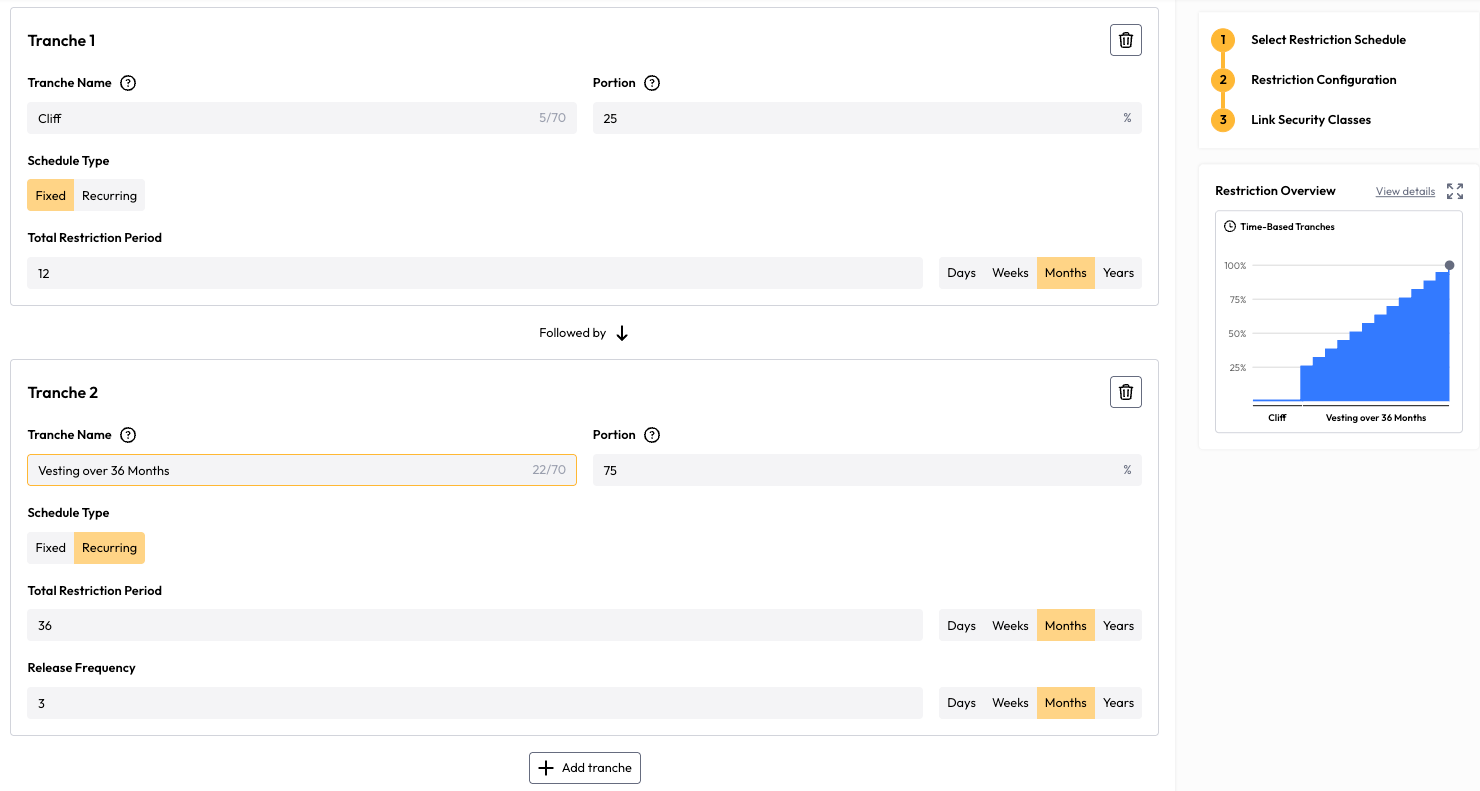
When the In Tranches schedule type is selected, two dedicated sections appear below the Description field: Time-Based Tranches and Events. Together, these sections let you define a multi-stage release schedule.
Important: The Portion percentages across all time-based tranches and event tranches combined must add up to exactly 100%. The platform will display a validation warning if the total is not 100% when you attempt to save or publish.
Remainder Handling
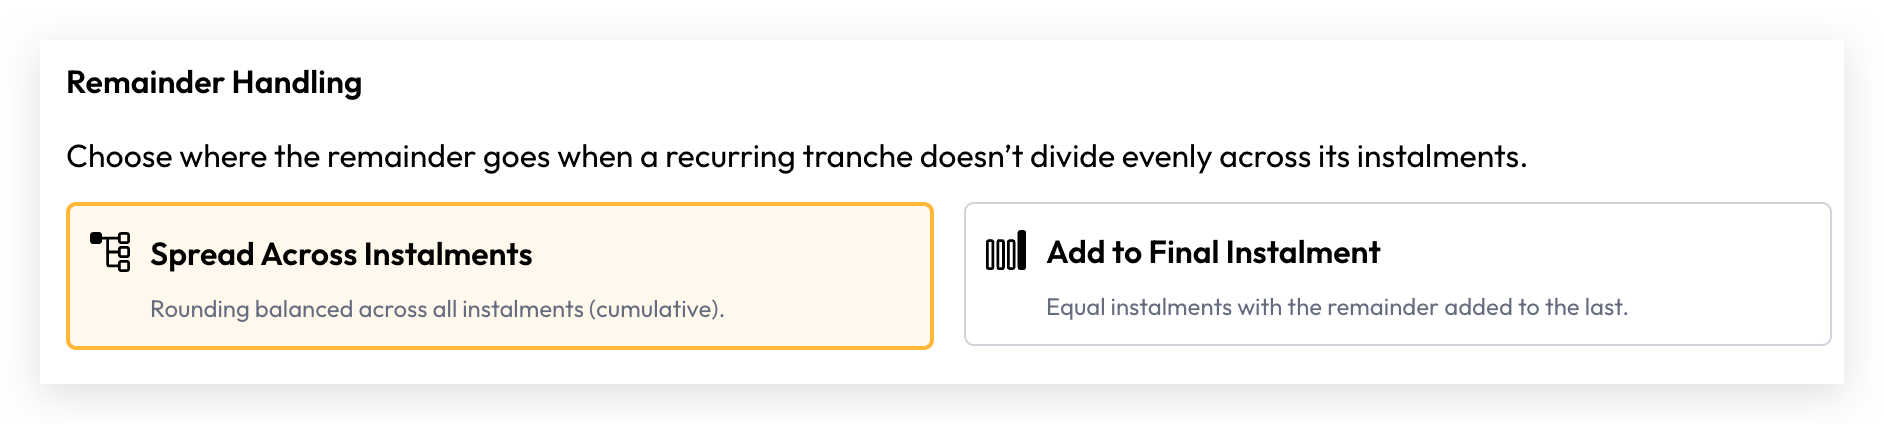
When a restriction is applied, Cuspy splits the restricted quantity in two stages. First it splits it across your tranches by their portions. Then it splits each Recurring tranche across its instalments.
A tranche often does not divide evenly into whole securities (or into the decimal places your security class allows). Remainder Handling decides which instalments carry the leftover.
Choose one of two options:
Example — 7,906 securities restricted under one 100% Recurring tranche, released every 3 months over 12 months, in a security class with 0 decimal places:
If the quantity divides evenly, both options give the same result. For example, 10,000 over 4 instalments is 2,500 each either way.
Note: Both options always release the full restricted quantity. Nothing is lost or added — only the placement of the extra units changes.
Things to know
Only Recurring tranches are affected. A tranche with a Fixed schedule type, and every event, releases in one amount, so the setting has no effect on it.
The split between tranches is not affected. Each tranche always gets its stated portion, rounded so the tranches add up to the full quantity. For example, 7,906 across a 60% and a 40% tranche gives 4,744 and 3,162.
Decimal places come from the security class. The unit of rounding is set by the security class's Number of Decimals. With 2 decimal places, 100.00 over 3 instalments under Add to Final Instalment gives 33.33 / 33.33 / 33.34.
You can see the setting later. Remainder Handling is shown on the rule's Details tab, and on the rule card when you apply the rule to a transaction.
Tip: Not sure which option to choose? Select Simulate restriction to see the exact instalment quantities for a real quantity before you publish. See Simulate a Restriction.
Time-Based Tranches
Click + Add tranche to add a time-based tranche. Each tranche has its own card with the following fields:
Tranche Name
A descriptive name to identify this tranche (up to 70 characters), such as "Cliff" or "Vesting Schedule".
Portion
The percentage of total restricted securities to be released for this tranche. All tranche portions (time-based and event combined) must add up to exactly 100%.
Schedule Type
Choose how this tranche's portion is released:
Fixed — The portion is released in full at the end of the specified Total Restriction Period.
Recurring — The portion is released in equal instalments over the Total Restriction Period at the interval defined by the Release Frequency. Selecting Recurring reveals the additional Release Frequency field.
Total Restriction Period
The total duration of this tranche's restriction. Enter a number and select a unit: Days, Weeks, Months, or Years.
Release Frequency (shown only when Schedule Type is Recurring)
How often a release instalment occurs within the Total Restriction Period. Enter a number and select a unit: Days, Weeks, Months, or Years. For example, a Total Restriction Period of 24 Months with a Release Frequency of 6 Months would result in four equal releases, one every 6 months.
You can add multiple tranches by clicking + Add tranche again. Each tranche is numbered sequentially (Tranche 1, Tranche 2, etc.) and can be deleted individually using the trash icon on its card.
Events
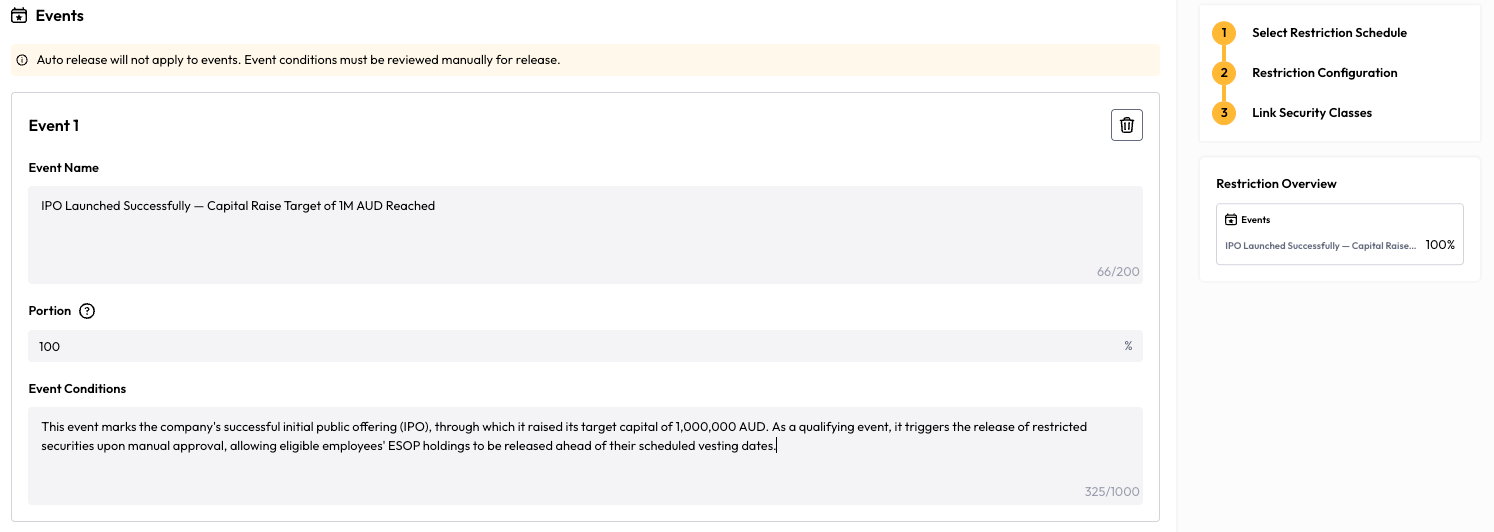
The Events section allows you to define event-based tranches — portions of securities that are released when a specific qualifying event occurs, rather than on a fixed date.
Note: Auto-release does not apply to event tranches. Event conditions must always be reviewed manually before release, regardless of the Release Approval setting configured above.
Click + Add event to add an event. Each event has its own card with the following fields:
Event Name
A description of the event (up to 200 characters).
Portion
The percentage of total restricted securities to be released when this event occurs. This counts toward the overall 100% total across all tranches.
Event Conditions
A detailed description of the conditions that must be met for this event to trigger a release (up to 1,000 characters).
You can add multiple events by clicking + Add event again. Each is numbered sequentially and can be deleted using the trash icon.
Restriction Overview panel
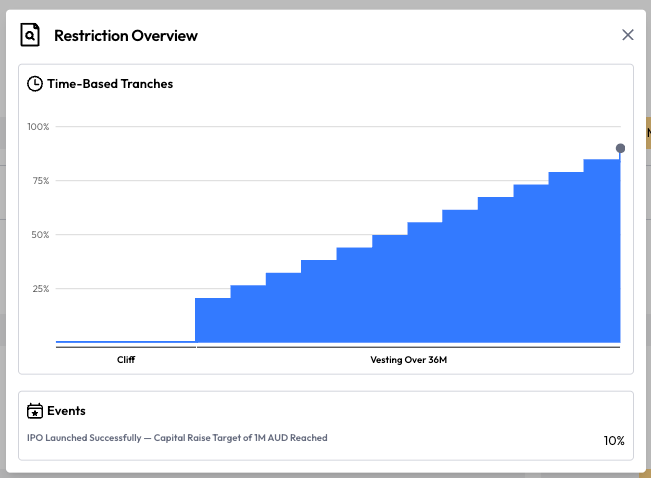
When using the In Tranches schedule, a Restriction Overview panel is displayed on the right side of the screen. Once you have added tranche and event details, this panel will display a summary of your configured schedule. It remains empty until tranche information has been entered.
Step 3: Link Security Classes
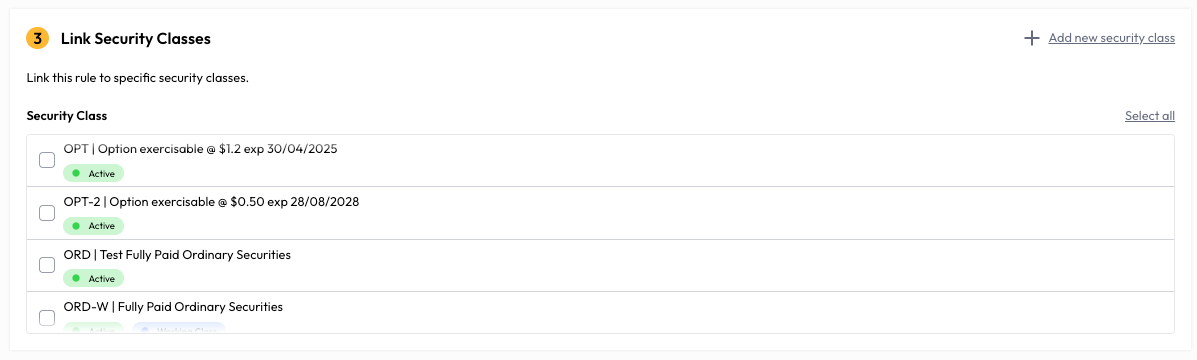
In this step, you link the rule to one or more of your existing security classes.
All active security classes in your organisation are displayed as a selectable list. Each entry shows the security class code, its name, and its current status (e.g., Active). Select the checkboxes next to the classes you want this rule to apply to.
Use Select all to select every security class at once.
Use + Add new security class to create a new security class if the one you need does not yet exist.
Saving and Publishing
Once you have completed all three steps, you have three options at the bottom of the page:
Tips & Best Practices
Use the Fixed schedule when the entire holding should be released at once on a single date or event.
Use the In Tranches schedule for graduated vesting structures, cliff-and-vest arrangements, or phased lock-up releases.
When configuring tranches, ensure the Portion percentages across all time-based tranches and events add up to exactly 100% before publishing.
Use the Recurring schedule type within a tranche when securities should be released gradually in equal instalments over a period (e.g. monthly vesting over 2 years).
Event tranches always require manual review for release — they cannot be set to automatic, even if the rule-level Release Approval is set to Automatic.
Use the Description field to record the business rationale for the rule, which is especially useful for audit trails.
Use Add to Final Instalment when every instalment should be the same size. Keep the default, Spread Across Instalments, when the total released by each date should track the schedule as closely as possible.
Still need help? Share an idea